9. Network Settings
Learn how to configure network settings in the Amadeus Wallet Extension, including switching between Mainnet and Testnet, and configuring custom RPC endpoints.
Overview
The Amadeus Wallet Extension supports multiple networks:
- Mainnet: Production network with real tokens
- Testnet: Testing network with test tokens
- Custom RPC: Connect to custom network endpoints
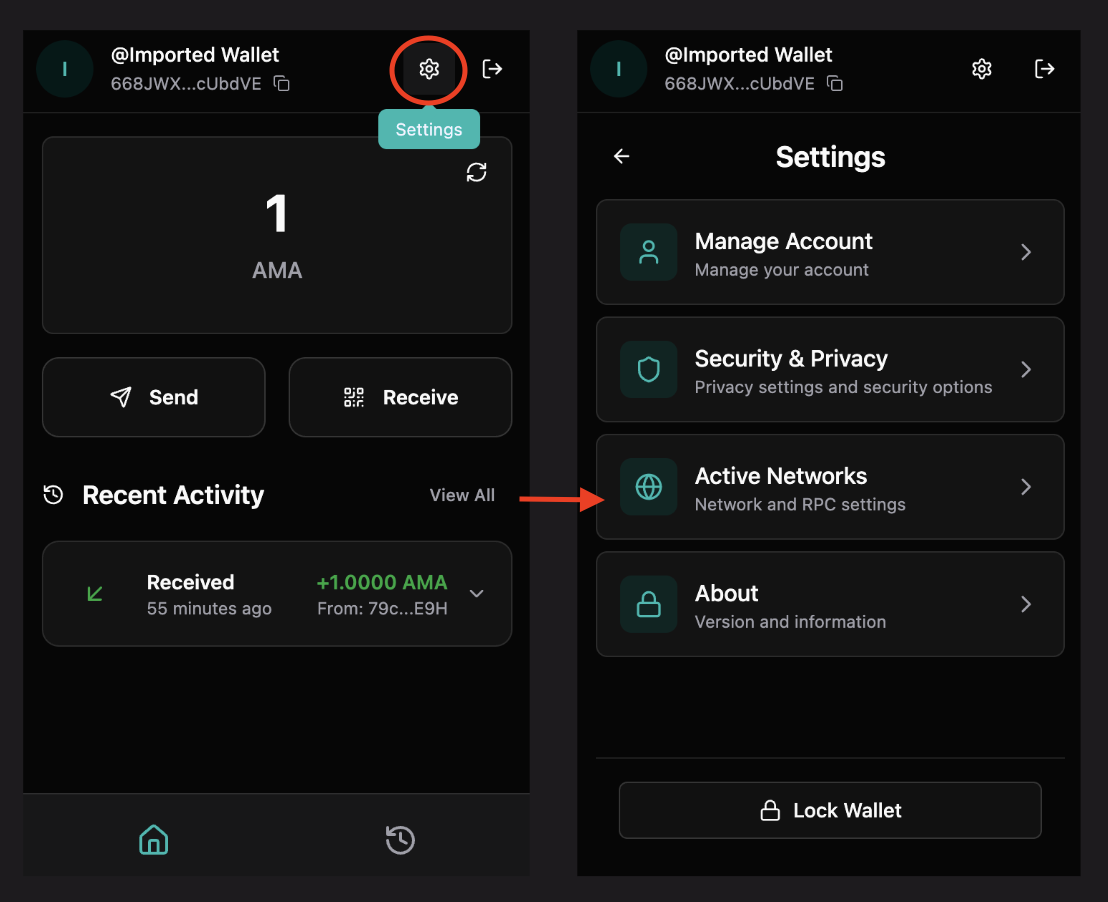
Accessing Network Settings
- Open the Amadeus Wallet Extension
- Go to Settings
- Click "Active Networks"
Network Options
Mainnet
Purpose: Production network for real transactions
Configuration:
- RPC URL:
https://mainnet-rpc.ama.one - Explorer:
https://explorer.ama.one - Tokens: Real AMA tokens with actual value
When to use:
- Real transactions
- Production dApps
- Actual token transfers
Testnet
Purpose: Testing network for development and testing
Configuration:
- RPC URL:
https://testnet-rpc.ama.one - Explorer:
https://testnet.explorer.ama.one - Tokens: Test tokens with no real value
When to use:
- Testing transactions
- Development work
- Learning and experimentation
- Trying new features
Custom RPC
Purpose: Connect to custom network endpoints
Configuration:
- RPC URL: Your custom endpoint
- Explorer URL: Optional custom explorer
- Use Case: Private networks, local development, custom nodes
When to use:
- Local development
- Private networks
- Custom node configurations
- Testing with specific nodes
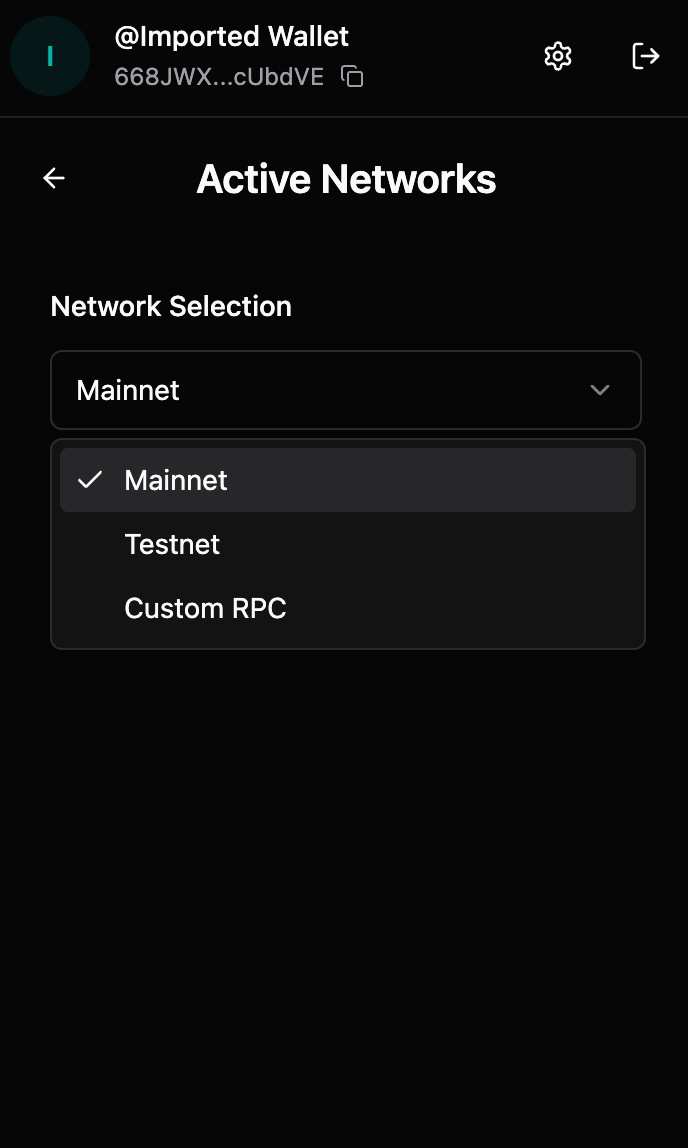
Switching Networks
Step 1: Open Network Settings
- Go to Settings → Active Networks
- You'll see the network selection dropdown
Step 2: Select Network
- Click the network dropdown
- Select your desired network:
- Mainnet
- Testnet
- Custom RPC
Step 3: Network Active
- Selected network becomes active immediately
- All transactions use the new network
- Balance and history sync to the new network
Configuring Custom RPC
Step 1: Select Custom RPC
- In network settings, select "Custom RPC"
- Input fields will appear for configuration
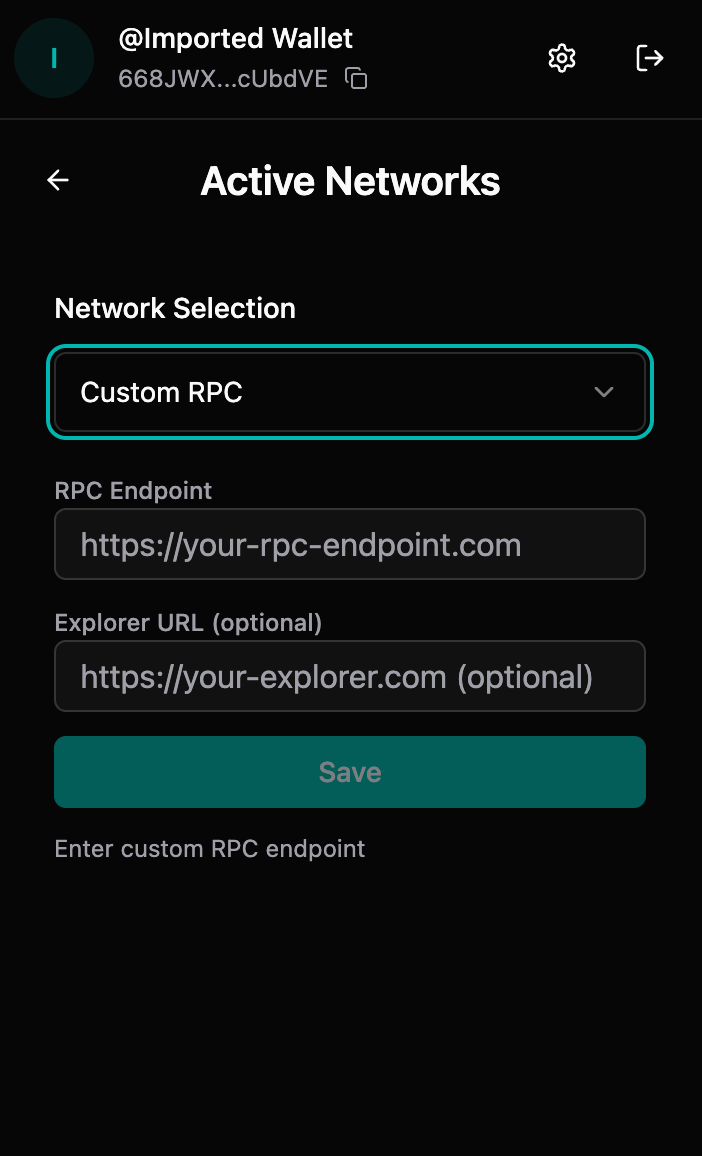
Step 2: Enter RPC Endpoint
- RPC Endpoint field:
- Enter your custom RPC URL
- Format:
https://your-rpc-endpoint.com - Must be a valid HTTP/HTTPS URL
- Click "Save" when done
Step 3: Enter Explorer URL (Optional)
- Explorer URL field (optional):
- Enter custom explorer URL if available
- Format:
https://your-explorer.com - Leave empty to use default explorer
- Click "Save" when done
Step 4: Save Configuration
- Click "Save" button
- Custom network becomes active
- Extension connects to your custom endpoint
Network-Specific Data
Important Notes
- Balances: Separate for each network
- Transaction History: Network-specific
- Addresses: Same address across networks (but balances differ)
- Tokens: Network-specific token balances
Switching Considerations
When switching networks:
- ⚠️ Your balance will change (network-specific)
- ⚠️ Transaction history is separate per network
- ⚠️ Ensure you're on the correct network for your use case
- ⚠️ Transactions on one network don't appear on another
Verifying Network
Check Current Network
- Go to Settings → Active Networks
- Current network is displayed at the top
- Network details shown below
Network Indicators
- Network name displayed in settings
- Explorer links use current network
- Transaction history filtered by network
Troubleshooting
Wrong network selected
If you're on the wrong network:
- Go to network settings
- Switch to correct network
- Verify balance and transactions
- Ensure dApp matches your network
Custom RPC not connecting
Possible causes:
- Invalid RPC URL
- Network connectivity issues
- RPC endpoint down
- CORS or security restrictions
Solutions:
- Verify RPC URL is correct and accessible
- Check internet connection
- Test RPC endpoint in browser
- Contact RPC provider if issues persist
Balance not showing
If balance doesn't appear:
- Verify network is correct
- Check internet connection
- Wait for sync to complete
- Refresh the extension
- Verify address on explorer
Transactions on wrong network
If transactions appear on wrong network:
- Switch to the correct network
- Transactions are network-specific
- Cannot transfer between networks
- Verify network before transactions
Best Practices
- Verify Network: Always verify network before transactions
- Test First: Use Testnet for testing
- Match dApps: Ensure dApp network matches wallet network
- Custom RPC: Only use trusted custom RPC endpoints
- Network Awareness: Be aware which network you're on
Security Considerations
Network Security
- ✅ Use official network endpoints when possible
- ✅ Verify custom RPC endpoints are trusted
- ✅ Be cautious with custom networks
- ❌ Don't use untrusted custom RPC endpoints
- ❌ Verify network before large transactions
Phishing Prevention
- Always verify you're on the correct network
- Check network settings regularly
- Be cautious of network switching prompts
- Verify dApp network matches wallet network
Advanced Configuration
Custom Network Use Cases
- Local Development: Connect to local node
- Private Networks: Connect to private blockchain
- Testing: Use test networks
- Custom Nodes: Connect to specific node providers
RPC Endpoint Requirements
Custom RPC endpoints must:
- Support HTTP/HTTPS
- Implement Amadeus RPC API
- Be accessible from your browser
- Have proper CORS configuration